
Quick Start
Prerequisites
Before using PicList, please ensure:
- PicList has been downloaded and installed
- Node.js is installed (if you need to use plugin features)
Getting Started
- Default Image Host: PicList uses S.EE as the default image hosting service
- Auto Copy: URLs are automatically copied to clipboard after successful upload
- Multiple Formats: Supports Markdown, HTML, URL, UBB, and custom link formats
Upload Methods Overview
PicList provides three main upload methods. Choose based on your workflow:
| Upload Method | Supported Platforms | Features | Recommended Use Case |
|---|---|---|---|
| Mini Window | Windows / Linux | Quick & lightweight, drag-and-drop | Frequent uploads, desktop shortcuts |
| Top Bar | macOS | Native system integration | Daily use for macOS users |
| Main Window | All Platforms | Full-featured, visual management | Batch operations, album management |
Mini Window Upload
Platform Support
- Windows / Linux: Full feature support
- macOS: Please use top bar upload instead
Upload Methods
Drag & Drop Upload
- Drag image files directly to the Mini window
- Supports dragging image URL links
Clipboard Upload
- Copy image to clipboard
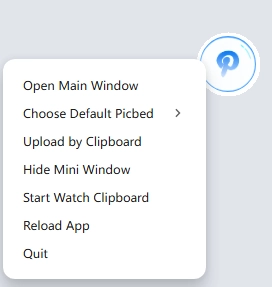
- Right-click Mini window → Select "Upload by Clipboard"
Auto Watch Upload
- Click "Start Watch Clipboard"
- Any copied image will be automatically uploaded
Switch Image Host
- Right-click to open menu
- Switch image host in "Choose Default Picbed"
Clipboard Upload Notes
From v3.5.0 onwards, the application supports recognizing absolute file path text and file:// URLs from the clipboard.
Different system clipboard support:
- macOS / Windows 10+: Support copying image files directly for upload
- Windows 7 / Linux: Need to open image first, right-click to "Copy Image"
- Screenshot Tools: Screenshots on all platforms are automatically copied to clipboard and can be uploaded directly
Top Bar Upload
Platform Support
- macOS: Native system integration experience
- Windows/Linux: Not supported
Upload Methods
Drag & Drop Upload
- Drag images directly to the PicList icon in the top bar
Clipboard Upload
- Copy image to clipboard
- Click PicList icon in top bar
- Click the image in "Waiting Upload" area to start upload
Main Window Upload
Platform Support
All platforms supported with complete functionality
How to Open Main Window
The method varies by operating system:
Windows
- Find the PicList icon in the bottom-right taskbar
- If not visible, click the small arrow to expand hidden icons
- Left-click the icon to open the main window
macOS
- Find the PicList icon in the top menu bar
- Click the icon and select "Open Main Window"
Linux
- Right-click the Mini window or taskbar icon
- Select "Open Detailed Window"
Main Window Upload Methods
Once the main window is open, you can upload images through:
Drag & Drop Upload
- Drag image files directly to the upload area
- Supports multiple files simultaneously
Click Upload
- Click the upload area
- Select images from the file browser that appears
Clipboard Upload
- Copy image to clipboard
- Click the "Clipboard Image" button
URL Upload
- Click the "URL" button
- Enter the image URL in the popup window
Task Upload
- Open PicList task upload feature
- Add files and set upload intervals
- Start the task for automatic upload
Next Steps
You have mastered the basic upload methods of PicList.
What you can do next:
- Configure Image Hosts - Set up your preferred image hosting services
- Manage Albums - View and manage uploaded images
- Advanced Settings - Customize PicList behavior
- Command Line Usage - Learn advanced features